Even the supposed cheerleaders of the 'mainstream' economic-view are now starting to dish on homeownership. They point out that homes-as-investment have only returned at most 2.2% (after accounting for inflation) over the past decade.
http://finance.yahoo.com/real-estate/article/107122/Is-Your-Home-a-Good-Investment?
I'm just sayin' ....
Wednesday, May 27, 2009
Friday, May 15, 2009
How I tuned the dirt removal filter, part 2
HOW THE DE-SPOT FILTER WORKS
=====================
The De-Spot filter uses several parameters to identify what is dirt and what is not. In general it works by looking for groups of pixels on an individual frame that don't exist on the preceding, or subsequent, frame. Here are the primary settings (or, at least, the only ones I used!):
FYI - The function for detecting motion is called Motion Estimation (ME) and is the most important element of the filter!
KEEPING NOTES
============================
I eventually realized that I needed to keep detailed notes about specific spots/problems for specific Despot settings, and added the following section (all commented-out) to my AVS script:
===============================
Here's the 'general' procedure I followed:
_______________
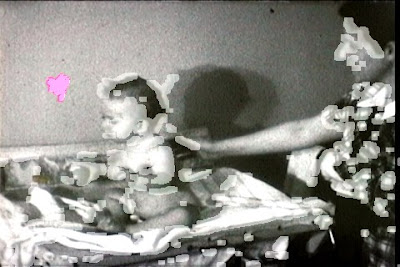
Here's an example of the ME error on the eye of a bouncing baby (my aunt, btw)

FINAL OUTPUT
=========================
I quickly realized that I couldn't fix everything in the whole video with just one group of settings. So I used VirtualDub to chop-up the original video into scenes, or even sub-scenes, and created custom AVS scripts for each. I also took the opportunity to adjust the brightness and contrast on several of the scenes, to try and make them easier to see.
Finally, for each scene, I output it to the FFDSHOW video codec set to MJPEG '100%' quality. I was then able to load all the clips together in Nero Vision and create a much nicer DVD than I originally received.
=====================
The De-Spot filter uses several parameters to identify what is dirt and what is not. In general it works by looking for groups of pixels on an individual frame that don't exist on the preceding, or subsequent, frame. Here are the primary settings (or, at least, the only ones I used!):
p1 = sensitivity to detect new spotsThe three 'sensitivity' settings are actually kinda misnamed as higher settings don't necessarily mean More Sensitive. P1 and P2 are the minimum 'difference' to trigger a spot detection, so higher values make it LESS likely that they'll detect a spot (or, in the case of P2, detect all of it). MTHRES is the amount of 'motion' required for a spot to be ignored, i.e., low values make the filter skip a lot of spots! The default setting for MTHRES is very cautious, 16, and misses a lot of dirt.
p2 = sensitivity to find size/edges of spots
mthres = sensitivity to identifying dirt spots vs non-dirt spots in-motion
minpts = minimum spot-size
pwidth = maximum spot width
pheight = maximum spot height
FYI - The function for detecting motion is called Motion Estimation (ME) and is the most important element of the filter!
KEEPING NOTES
============================
I eventually realized that I needed to keep detailed notes about specific spots/problems for specific Despot settings, and added the following section (all commented-out) to my AVS script:
------------TUNING THE FILTER
# FRAME # - NOTES
# 11 - hair standing-up from back of head @ mthres=43 p=24,8
# 15 - tear, requires mthres>=43 @ p=16,12
# 24 - hair 'aimed' at baby's head
# 36 - fingerprint next to (same size as) baby's head, requires p=64,8
# at p=64,6 it's only half removed, at p=64,4 it's totally missed
# 40 - round dirt
# 55 - ME error on ear @ mthres=43 p=36,12 or 56,12
# ME NOTES
# mthresh >= 20 to catch dirt at frame 77
# mthresh >= 25 to catch dirt at frame 81
# pwidth >= 120 to catch dirt at frame 112
# Motion-Estimation errors at frames 158, 179, 200, 221
# minpts >= 80 fixes half the error at frame 158
# minpts >= 110 fixes error at frame 158, 221
# minpts >= 140 fixes error at frame 200; still has error at 179
------------
===============================
Here's the 'general' procedure I followed:
- First I observed what kind of results I obtained from the default settings in De-Spot. The settings for p1, p2, and mthres are relatively insensitive, i.e., they miss a lot of obvious dirt.
- Starting with MTHRES (detect motion) I increased the value until it detected all the legitimate dirt. At this point, however, it was also making a lot of mistakes, e.g. detecting eyes and ears as 'dirt'.
- Within that opening scene (the dirtiest, btw) I varied the P1 and P2 settings to see if I could eliminate any of the false positives.
- I increased the maximum allowed dirt-size, pwidth and pheight, so that the filter wouldn't ignore the bigger clods of dirt.
- Finally I increased the minimum dirt-size, minpts, to try and eliminate false-positives on eyes/ears while still detecting actual dirt (which was usually quite large).
_______________
Here's an example of the ME error on the eye of a bouncing baby (my aunt, btw)

FINAL OUTPUT
=========================
I quickly realized that I couldn't fix everything in the whole video with just one group of settings. So I used VirtualDub to chop-up the original video into scenes, or even sub-scenes, and created custom AVS scripts for each. I also took the opportunity to adjust the brightness and contrast on several of the scenes, to try and make them easier to see.
Finally, for each scene, I output it to the FFDSHOW video codec set to MJPEG '100%' quality. I was then able to load all the clips together in Nero Vision and create a much nicer DVD than I originally received.
Thursday, May 14, 2009
How to remove dirt from old film transfers, part 1
BACKGROUND
=====================
I just finished a very exciting project: My mom located a really old family film from when she was a child back during the Great Depression! The film is absolutely one-of-a-kind and had become sort of a legend to me, as I'd heard that it existed but no one knew what had happened to it. Well, my mom found it several months ago and I secretly had it transferred to digital, in preparation for Mother's Day. This was not my first foray into the realm of digital film transfers and I wanted to do the best possible transfer of this priceless recording. And because it was on 16mm film I was hopeful that it would have significantly better picture quality than the less-old 8mm films I'd previously converted.
Now, there are lots of shops offering film-to-DVD transfer. But I've spent literally years searching for someone who could perform film-to-BluRay transfers, i.e., to capture the full picture quality, in high-definition. I finally located this shop:
(Actually, I just checked and they charge MORE for just giving you the raw files. Apparently they're charging you for the resulting picture quality rather than the amount of work required on their part.)
THE ORIGINAL TRANSFER
=====================
Alas, the film showed all the classic signs of old age. First of all, whoever owned the camera (which was surely a luxury back in the 1930's) didn't do a very good job with the settings. Most of the scenes were either over-exposed or under-exposed. And one segment of Christmas 1936 was out of focus for the entire time. Even worse, the film did not have the high-resolution of detail that I'd hoped for.
Most upsetting, however, was the amount of dirt on the film, especially in the first 30 seconds or so. I'd assumed that the film-transfer machines were capable of detecting and 'deleting' these problems. Instead, removing this dirt from the image was what inspired me to fix the entire film.
Actually, I wanted to fix the transfer and the DVD, as the version they sent me was accidentally recorded in "2-hr" mode (only 5 Mbps, or half the max) and with noticeable distortion. Since it was such a short piece of film there was no reason not to have recorded it at maximum quality, 10 Mbps or "1-hr" mode in their parlance. They also billed me unnecessarily for audio transfer (there was none). Rather than ask for a refund I asked them to just send me the original raw high-definition files. They described them as "HD-AVI" and so I was curious to see what they meant by that. Basically, their film-transfer machine outputs 1920x1080i HDV (M-JPEG). I did some quick tests and found that the compression was set at 85%, a reasonable setting but one that I ignored during my subsequent editing.
THE SOFTWARE I USED
=====================
Note - All of these programs are open-source software, i.e., they cost nothing to use!
The one commercial program I used was Nero Vision (from the Nero Ultra Suite) to create a new DVD with menu and soundtrack.
THE GENERAL PROCEDURE
=====================
The first thing I did was identify what format everything was recorded-in. I then used VirtualDub to demux the original AVI (separate the audio and video streams). Even with 85% quality/compression the resulting video file was 6 GB (for 11 minutes!). Finally, I setup an initial AVS script, both to trim the black segments on left/right (the film had an aspect ratio of 4:3 whereas the 'high definition' transfer was done at 16:9 widescreen) and also to start experimenting with the Despot settings.
Here's what my AVS script looked like for the first segment:
(subsequent segments were similar with only slight adjustments to the Despot parameters)
One question I had was about removing the duplicate frames. The original file was 1080i 29.97 fps and every other frame was a duplicate (which interfered with detecting dirt on individual frames!). I used the 'SelectEven' command in my script and this removed the duplicates while also reducing the frame-rate to 14.985. Most importantly, it didn't seem to reduce the resolution. I had read that M-JPEG was recorded in interlaced format and so I was afraid that SelectEven might result in a 1920x540 image; it didn't.
Whew! This is by far my longest blog entry to-date. So I think I'll take a break, make this a two-parter. In my next blog entry I'll detail the method I used to tune the de-spot filter. It was as much an art as a science!
=====================
I just finished a very exciting project: My mom located a really old family film from when she was a child back during the Great Depression! The film is absolutely one-of-a-kind and had become sort of a legend to me, as I'd heard that it existed but no one knew what had happened to it. Well, my mom found it several months ago and I secretly had it transferred to digital, in preparation for Mother's Day. This was not my first foray into the realm of digital film transfers and I wanted to do the best possible transfer of this priceless recording. And because it was on 16mm film I was hopeful that it would have significantly better picture quality than the less-old 8mm films I'd previously converted.
Now, there are lots of shops offering film-to-DVD transfer. But I've spent literally years searching for someone who could perform film-to-BluRay transfers, i.e., to capture the full picture quality, in high-definition. I finally located this shop:
Video Conversion ExpertsFor my little 11-minute film it cost $200 to transfer it to digital (at high-resolution) and create both a Bluray and DVD version. If I'd known all the work I was going to put into fixing the file I could've saved myself about half the cost and just requested the raw files; this is what ended-up happening anyways.
1010 W Chandler Heights Rd, Ste 2
Chandler, AZ 85248
www.videoconversionexperts.com
(800) 575-6202
(Actually, I just checked and they charge MORE for just giving you the raw files. Apparently they're charging you for the resulting picture quality rather than the amount of work required on their part.)
THE ORIGINAL TRANSFER
=====================
Alas, the film showed all the classic signs of old age. First of all, whoever owned the camera (which was surely a luxury back in the 1930's) didn't do a very good job with the settings. Most of the scenes were either over-exposed or under-exposed. And one segment of Christmas 1936 was out of focus for the entire time. Even worse, the film did not have the high-resolution of detail that I'd hoped for.
Most upsetting, however, was the amount of dirt on the film, especially in the first 30 seconds or so. I'd assumed that the film-transfer machines were capable of detecting and 'deleting' these problems. Instead, removing this dirt from the image was what inspired me to fix the entire film.
Actually, I wanted to fix the transfer and the DVD, as the version they sent me was accidentally recorded in "2-hr" mode (only 5 Mbps, or half the max) and with noticeable distortion. Since it was such a short piece of film there was no reason not to have recorded it at maximum quality, 10 Mbps or "1-hr" mode in their parlance. They also billed me unnecessarily for audio transfer (there was none). Rather than ask for a refund I asked them to just send me the original raw high-definition files. They described them as "HD-AVI" and so I was curious to see what they meant by that. Basically, their film-transfer machine outputs 1920x1080i HDV (M-JPEG). I did some quick tests and found that the compression was set at 85%, a reasonable setting but one that I ignored during my subsequent editing.
THE SOFTWARE I USED
=====================
- VirtualDub 1.8.8
www.virtualdub.org - AviSynth 2.5.6
www.avisynth.org - De-Spot filter for Avisynth
avisynth.org.ru/despot/despot.html - FFDshow
www.videohelp.com/tools/ffdshow
Note - All of these programs are open-source software, i.e., they cost nothing to use!
The one commercial program I used was Nero Vision (from the Nero Ultra Suite) to create a new DVD with menu and soundtrack.
THE GENERAL PROCEDURE
=====================
The first thing I did was identify what format everything was recorded-in. I then used VirtualDub to demux the original AVI (separate the audio and video streams). Even with 85% quality/compression the resulting video file was 6 GB (for 11 minutes!). Finally, I setup an initial AVS script, both to trim the black segments on left/right (the film had an aspect ratio of 4:3 whereas the 'high definition' transfer was done at 16:9 widescreen) and also to start experimenting with the Despot settings.
Here's what my AVS script looked like for the first segment:
(subsequent segments were similar with only slight adjustments to the Despot parameters)
------------I was then able to open the .AVS file directly in Virtualdub and immediately see the effect. Note the use of 'show=1' in the Despot parameters -- this produced a very cool diagnostic effect! Instead of showing the final result, the diagnostic mode shows you a colored-in version where you can see which parts of the image look like 'dirt' but are being left-alone because of Motion Estimation (shown in gray) versus which parts will actually be removed (shown in purple).
# REMOVE DIRT FROM 1ST SCENE (FRAME 1-64)
AVIsource("16mm_HDAVI.avi")
# SelectEven() to reduce frame-rate by half
SelectEven()
# Crop(Left-Pos,Top-Pos,Right-Size,Bottom-Size)
Crop(250,0,1440,0)
# run 'despot' plugin for old film
LoadPlugin("c:\program files\avisynth 2.5\plugins\despot.dll")
ConvertToYV12()
## Default settings for p1, p2, and mthres
#DeSpot(p1=24, p2=12, mthres=16, sign=1, minpts=10, interlaced=false)
# p1=sensitivity for detecting new dirt spots
# p2=sensitivity for finding the edges of dirt spots
# mthres=sensitivity for differentiating dirt spots from spots in-motion
# include 'show=1' for diagnostic mode
DeSpot(p1=64, p2=8, pwidth=540, pheight=300, minpts=80, mthres=43, show=1)
ConvertToRGB24
------------

One question I had was about removing the duplicate frames. The original file was 1080i 29.97 fps and every other frame was a duplicate (which interfered with detecting dirt on individual frames!). I used the 'SelectEven' command in my script and this removed the duplicates while also reducing the frame-rate to 14.985. Most importantly, it didn't seem to reduce the resolution. I had read that M-JPEG was recorded in interlaced format and so I was afraid that SelectEven might result in a 1920x540 image; it didn't.
Whew! This is by far my longest blog entry to-date. So I think I'll take a break, make this a two-parter. In my next blog entry I'll detail the method I used to tune the de-spot filter. It was as much an art as a science!
Wednesday, May 13, 2009
There is no Social Security Trust Fund
Here's a quick follow-up to my previous blog re non-existent Social Security Trust Fund. A recent Atlantic Monthly article pointed-out that the "trust fund" actually consists of nothing more than a filing cabinet full of (worthless) Treasury Bonds.
Which led me to this 2005 story in USA Today,
http://www.usatoday.com/news/washington/2005-04-05-trust-fund_x.htm
I understand that the government faces a difficult situation:
How do you 'bank' or otherwise invest the excess income (which is really just a loan) from Social Security? 'Investing' in the government's own bonds, however, seems misleading -- if not illegal or even treasonous!
I wish there were a way of forcing the federal government to:
- Stop buying Treasury bonds
- Remove the SS overpayments from the federal budget, i.e., so they weren't being used to paper-over deficit spending
Subscribe to:
Posts (Atom)